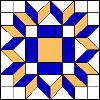
This block is classified as "advanced" by a book that gives detailed instructions in its assembly (Speed Cut Quilts by Donna Poster). It's difficult because pieces must be set in at right angles.
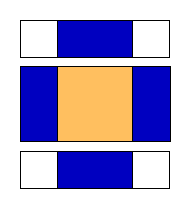
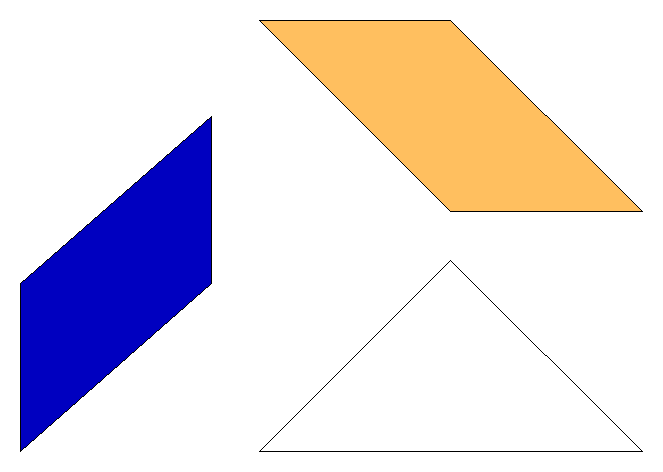
The Friendship Star block is an 8-patch pattern, meaning that the block is divided into 8 equal division on each side. If each equal division represents 2", then the overall block size will be 16" square. The templates needed to make a 16" Friendship Star block consist of one 4" square for the middle, one 2" square, a 2" by 4" rectangle, a quarter square triangle that has a 4" base and is 2" tall, and a parallelogram that is based on a 2" by 4" rectangle. All of these measurements are finished size, you will need to add your own seam allowances.
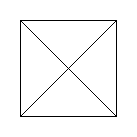
The template for the quarter square triangle and the parallelogram is provided. Depending on your printer, the size may come out slightly inaccurate. Please measure the parallelogram to see that it is 2" tall and 4" wide.
To make one block, using the colors identified above, you will need to cut the following:
16 2" finished square (2 1 / 2 " square) white fabric
12 quarter square triangles of white (Quick cutting, cut 3 squares 5 1 / 4"
then cut the squares in half and half again. See illustration below.
4 2" by 4" rectangles (2 1 / 2" by 4 1 / 2") of blue
fabric
12 parallelograms of blue fabric
1 4" square (4 1 / 2") of yellow fabric
12 parallelograms of yellow fabric
Quick cutting parallelograms:
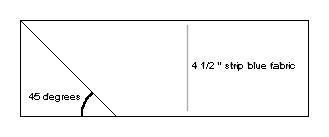
cut one 4 1 / 2" strip of blue fabric and one 4 1 / 2" strip of yellow
fabric
Stack the two strips together so that the wrong sides of the fabric are together and the blue fabric is on top.
On one edge of the strip cut a 45 degree angle (see illustration below) Most rulers have a 45 degree angle mark. You will need to have this mark on the bottom of the strip and then make your first cut.
Keeping the 45 degree angle on the bottom of the strip, slide your ruler over so that you can cut at 2 1 / 2" from the first cut. See illustration.
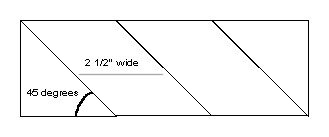
It is critical that you have an accurate 45 degree angle. Periodically you may need to "square up" the angle again. Cut 12 blue parallelograms. You will also have cut 12 yellow parallelograms that are the reverse image of the blue parallelograms when you have finished cutting the strip.
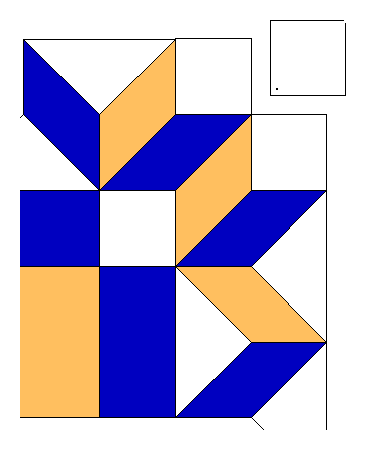
Sew a white square onto each end of two of the blue rectangles.
Sew a blue rectangle onto opposite sides of the yellow square.
Sew these three units together.
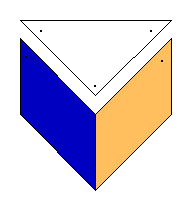
Sew 8 of the yellow parallelograms to the blue parallelograms. Begin and end your sewing a 1 / 4" from the edge of the pieces. Sew a white quarter square triangle to the unit. Do not sew beyond the 1 / 4" seam allowance on the edges of the white fabric (note the black dots).
 Unit
A
Unit
A
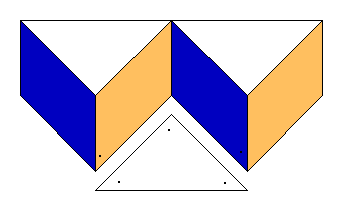
Join 2 unit A's to each other. Once again do not sew beyond the seam allowance. Then add another quarter square triangle to the unit.
 Unit
B
Unit
B
Sew a white square onto the end of each of the remaining blue and yellow parallelograms.
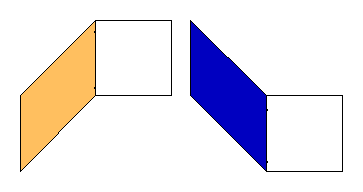 Unit
C
Unit
C
Attach one blue Unit C and one yellow Unit C to the end of Unit B.
 Unit
D
Unit
D
Attach Unit D to each side of the center square, Do not sew beyond the seam allowance.
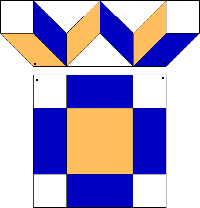
Sew the edges of the Unit D's together. Set in the remaining squares of white fabric.